
Sunday, December 27, 2015
A Little of the Shelby Daytona Mic and the Gibson Amp....
Recorded after a layoff from a respiratory infection...
Thursday, December 17, 2015
Re-Capping the Gibson GA5-T Skylark Amp
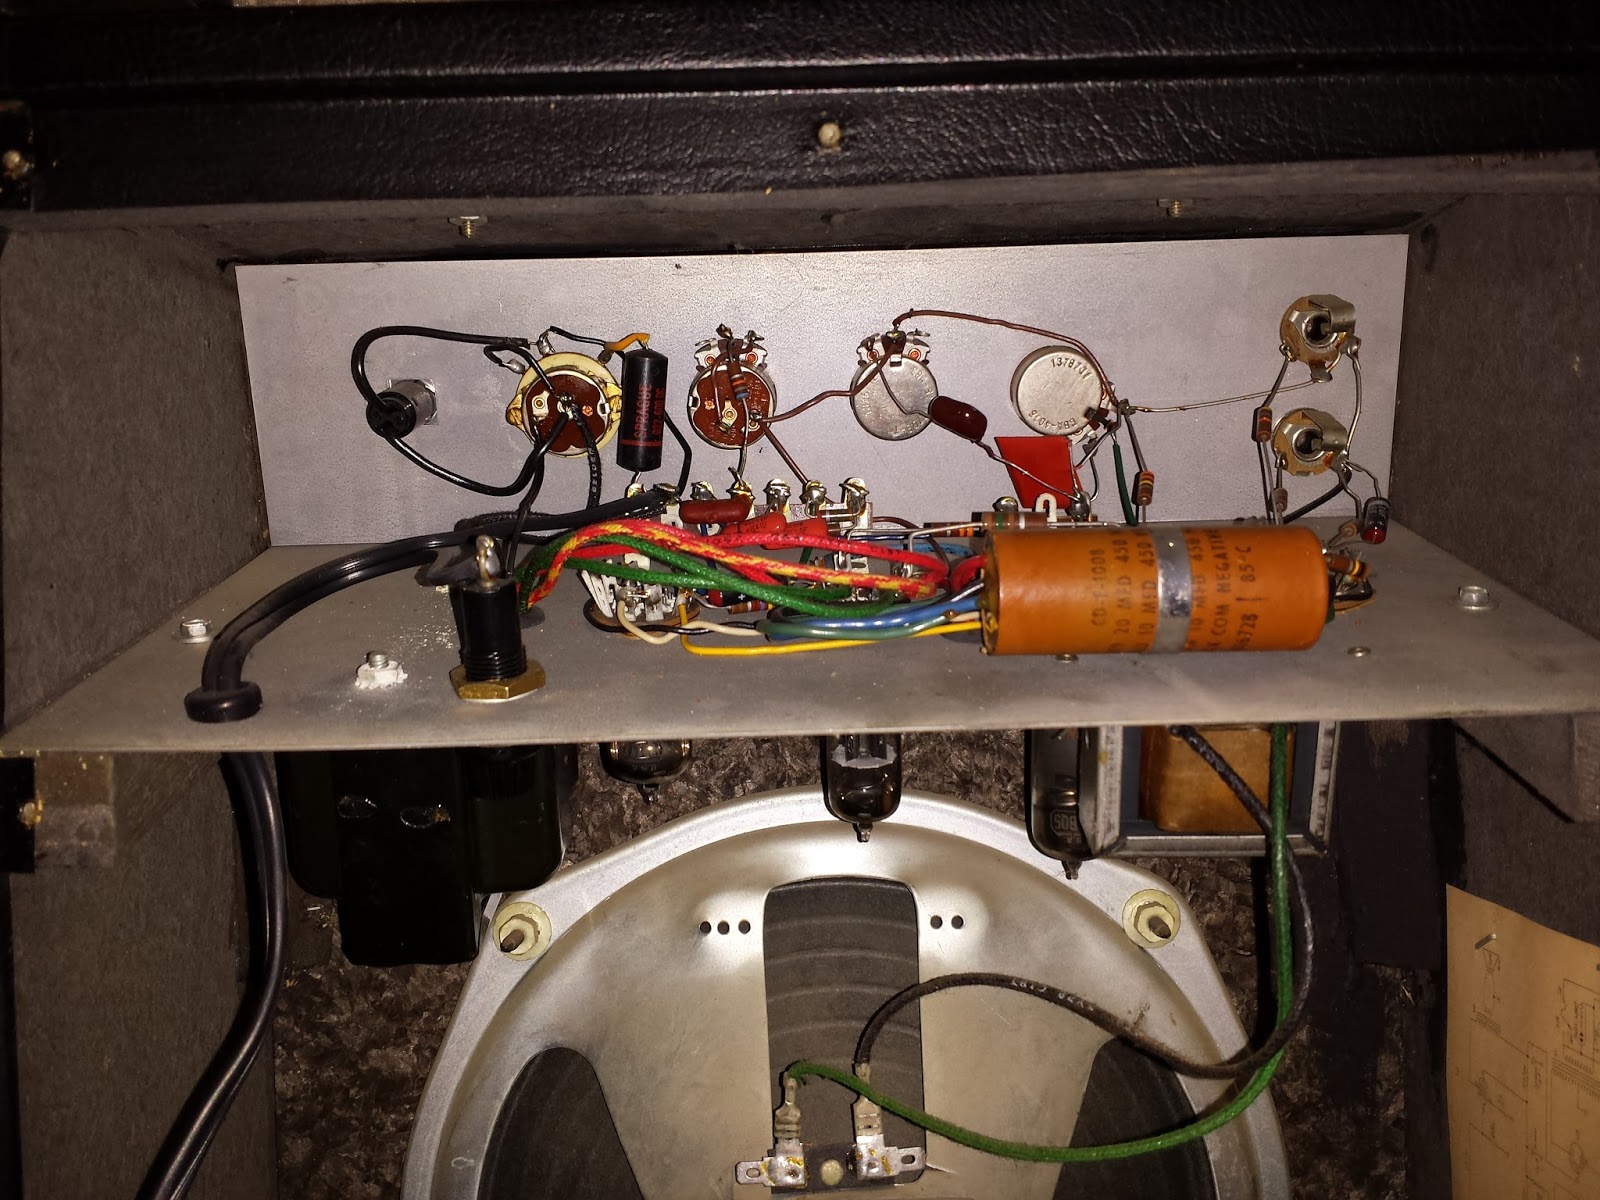
The Gibson is a killer little harp amp. Probably not a giggable amp, but awesome for playing at home and probably good for a garage jam.
Mine is absolutely perfect. Just like it left the factory. Unfortunately, that means it had all its original capacitors. That also meant it had a pretty substantial hum. Not a good thing....
I talked via email with Greg Heumann. He's the accepted expert on Kalamazoo amps, and since that is the direct cousin of my amp, I figured he'd be the right guy to ask. He confirmed that the caps in my amp were probably dead. Guessing that they are all 48 years old, I think he was/is right.
I found a good tutorial on my exact amp including a suggested set of caps to replace mine with and placed an order.
Link to the how to - http://www.paleoelectronics.com/2012/02/replacing-the-cap-can/
Link to the caps I used - https://www.tubesandmore.com/products/C-SA
The Skylark takes 2- 10mf x 500v and 1- 20mf x 500v capacitors to replace the Sprague 'cap can' which is really a 3 in 1 capacitor mounted on the chassis in the amp.
First off--- Safety first!!!! I discharged all the existing capacitors to ground using appropriate procedures and checked them all with my multimeter. If you don't know how to do this, don't touch your amp!!!!
To do this, I drilled out the rivet which held the clamp and slid the cap can out. Then I desoldered the old cap can connections. Next up, I soldered each of the new caps in at their positive locations. Finally I brought all of them to ground at the original grounding location. The paleoelectronics site mentioned the idea of re-grounding the caps, but I figured the old design worked and I am not really capable of improving upon it.
The results are pretty awesome. Quiet amp. Without a cord plugged in, it is dead quiet. With a poor quality cable plugged in, I begin to get a 60 cycle hum, but that is not the amp's issue IMO, that is poor quality gear plugged in.
Before

After

One other thing I've done to the amp to improve it. A known failure point of the amp is chassis flex which allows the upper chassis to flex, and then the connections inside to eventually flex and break. I designed a small aluminum brace which connects the upper corner of the chassis to the lower mounting point and eliminates this flex. The rivet head is not visible in normal use. The result is a solid chassis and no future breakage!


Tuesday, December 15, 2015
Shelby Daytona Mic Completed!
The mic is completed! And it Wails!!!! Frankly, I'm not worthy.
Following the last post, I finally got the chance to lay some clearcoat. I used Kustom Shop 2K Speed Clear and laid 3 nice wet coats. I cured it at 140 degrees for 20 minutes after letting it sit for about 30 minutes.
After then letting it sit for 7 hours, I wet sanded the shell with 2000 grit wet/dry paper in soapy water and then buffed the entire thing back with Meguiars Fine Cut Cleaner. The result is like a mirror. I'm pretty doggone pleased. No hint of edges from the stripes, no ripples or orange peel.
I re-installed the datatag with brass rivets and then soldered in the gear. Screwed in the grounds and the pot.
The silk inside the grill is black and white checkerboard, a la Checkered Flag! What is more appropriate for the grill of this mic!
I topped it off with a machined aluminum volume knob which works perfectly.


Sunday, December 6, 2015
Cobra Daytona Harp Mic?
A little more progress on this one. I was wanting to do something to this one to give it some character. I thought about ghosting some flames or some 'notes' on the sides, but I decided that my masking skills at that small of a size were just not going to get that job done. I continued to look for inspiration and then I was reading some bedtime 'Vintage Motorsports' magazine articles and saw a picture of the Shelby Daytona Couple. Never has there been a more beautiful race car, and conveniently that car happened to be basically the same blue as the blue I used on the microphone.....
So that meant some white racing stripes. Just like the sportscar racers representing the US in the 60's What is more cool than that!!!!
I used 3M fine line masking tape to mask off the stripes. Getting parallel stripes on such a convex curved surface is quite a feat.
I did test all of this (as well as a couple of different candies over the blue that did not work) on a sheet metal box to make sure that the masking and paint would all work well together. It was a good idea as it helped me get it right.
Here are the results.


Saturday, December 5, 2015
More On the Vintage Mic!
Made a lot more progress on the mic. After getting all of the electrical work and the details worked out, I tore it back down and bagged all the parts.
With the parts all bagged, I removed the badge on the front and got the shell ready to strip down.
Stripping down the shell was easy with some wet/dry 220 and some Dawn soap in the hot water. Very easy to get all of the paint of and back down to bare metal. I then did some shaping of the casting with some emery paper.

Next up, it was time to get this shell mounted on a stick and get some primer on it. I took my time laying the primer and laid several light coats, with baking over the heater between each coat.

I let the primer cure for several days over the heater and then wet sanded it with 400 wet/dry and laid 2 more coats before allowing 2 more days of curing. Then it was time to move on to color.
Initially, I was planning to paint it with some House of Color 'Black Diamond', but unfortunately the black diamond was really a top coat for some other color, not a base. As a result, I went back to my original plan of painting it with a nice metallic blue.

I shot about 5 coats of the blue, starting with some light coats and eventually moving to one final wet coat. The result was something pretty nice. Overall, I'm pretty happy with it.
Next up, I'm planning to see if I can ghost on some music notes or something similar in a pearl or other nice effect.
Sunday, November 29, 2015
Making The Vintage Amp Safe
Made the new Gibson safe with a 3 prong grounded plug yesterday. I talked with a buddy of mine who is a vintage tube amp guru and he suggested very highly that I get a grounded plug on this thing pronto and also remove the 'death cap' as well.
I did a bunch of research on how to get that done and went to work.
The cord is a 15 foot extension cord from Home Depot with the end cut off. I then made the necessary mods to the inside of the amp and installed the cord. That allowed me to also desolder the death cap at the same time.
The results are very good. Less buzz and a safe amp at the same time!


Friday, November 27, 2015
Finally A Good Blues Rig!
I've been playing through a series of different solid state amps for some time now. I've learned how to get the best tone from them, but at the end of the day, they are not a vintage tube amp, and they don't have the tone that I really wanted.
Searching Craigslist and Ebay and other sources had yielded a number of different good amps to buy in the 5 watt range ( Champ 500, VHT Special 6, etc) but every time I'd call on one, it was gone. What I really wanted was a Kalamazoo amp like Greg Heumann sells.
A couple days ago however, a Craigslist add popped up for a Gibson Skylark GA-5T. Looking it over in the add, it sure looked like a Kalamazoo. Some Googling yielded that it was made in the Kalamazoo factory. I don't yet know however if it is exactly the same circuit. More Googling to be done on that.
So I headed out to the shop and they had the amp. It was/is in awesome condition. I played it and several other 5 watt amps and this one beat the others hands down in the tone area. Price wise, I think they had it underpriced by about half- that did not bother me a bit. I walked out the door with the amp and its in my woodshed now for some playing. I'm still learning how to get the most out of it, but its got tone for days!

Opening up the amp, I can tell first that the covers have never been off, and that its never been worked on. This amp is perfect, just like it left the factory.


Thursday, November 26, 2015
More Progress On the New Mic....
So I made some more progress on this mic.
First up, I had to find a good pot (potentiometer) for the volume control. That took a bit of doing. I ended up with a 5 meg ohm pot that I bought from Digikey. Pricey little thing, but it had a 22mm (basically 7/8") long shaft, which was necessary to get through the body of the mic. It also has a very small body itself, which fits behind the element nicely.
To make this fit, I had to drill out the hole that was previously used for the ground. This started as a hole for a 6-32 screw, and I progressively enlarged it with increasing bits up to the 1/4" hole needed for the pot. For those that have never seen one of these before, I'm putting a volume knob in the hole where the mic body would have been mounted on a post in its stock configuration.
The 'Before' picture.

And the 'After' Picture.

After that, I needed to drill out one of the molding posts to make a new ground. I actually decided to drill two of them before I painted it. Just in case I wanted to ground the pot and the element to opposite sides for some reason, or the tapping of one failed. I tapped this again for a 6-32 screw.

Now it is time to wire this thing back up. A couple minutes with my multimeter told me which pins on the pot were for control and which was ground. I soldered up the circuit. For those that I don't plan on desoldering for paint, I went ahead and heat-shrinked them. I left the others bare. Everything fits pretty nicely. I'll change out the wire coming from the Amphenol connector to a white wire for 'signal' to allow easy understanding of the circuit when I rebuild that portion.

With the wiring done, I was able to screw the thing back together and give it a go. I stole the knob off my other nice mic to give it a try (I ordered some good 1/8" post knobs that should arrive tomorrow that will go on this mic).
Results with the 5 meg ohm pot are dead on and exactly what I wanted. No tone change, just volume change.

Crushed blue velvet 'silk' to protect the element.

Friday, November 20, 2015
Building A New Mic!
I've been looking for a new project, and decided to build myself a new harp mic. Don't really need one, but I wanted to build something new, so it was time. I found this one on Ebay and paid a good price for it. Looked pretty ugly when I pulled it out of the box, but it did have an element inside.
I was not sure if the element would work, but I was pleasantly surprised when I found that it did. Not only did it work, it sings! It has a great tone with my amp. Similar to the vintage crystal Astatic element in the Purple mic I built a few years ago. The element in this one is a Calrad C-3. Japanese made and has a good gasket with it.
For this one, I plan to clean it up, install a volume control, lay some cool paint and then do automotive clear on it. Unfortunately, the clear I laid on the Purple mic was just too delicate. I may also lay some Auto clear on that mic at the same time.
Here are the before pics.


Subscribe to:
Posts (Atom)